Layouts
Fundamentals
Django-crispy-forms defines another powerful class called Layout, which allows you to change the way the form fields are rendered. This allows you to set the order of the fields, wrap them in divs or other structures, add html, set ids, classes or attributes to whatever you want, etc. And all that without writing a custom form template, using programmatic layouts. Just attach the layout to a helper, layouts are optional, but probably the most powerful thing django-crispy-forms has to offer.
A Layout is constructed by layout objects, which can be thought of as form components.
All these components are explained later in Universal layout objects, what you need to know now about them is that every component renders a different template and has a different purpose. Let’s write a couple of different layouts for our form, continuing with our form class example (note that the full form is not shown again).
Let’s add a layout to our helper:
from crispy_forms.helper import FormHelper
from crispy_forms.layout import Layout, Fieldset, Submit

class ExampleForm(forms.Form):
    [...]
    def __init__(self, *args, **kwargs):
        super().__init__(*args, **kwargs)
        self.helper = FormHelper()
        self.helper.layout = Layout(
            Fieldset(
                'first arg is the legend of the fieldset',
                'like_website',
                'favorite_number',
                'favorite_color',
                'favorite_food',
                'notes'
            ),
            Submit('submit', 'Submit', css_class='button white'),
        )
When we render the form now using:
{% load crispy_forms_tags %}
{% crispy example_form %}
We will get the fields wrapped in a fieldset, whose legend will be set to ‘first arg is the legend of the fieldset’. The fields’ order will be: like_website, favorite_number, favorite_color, favorite_food and notes. We also get a submit button which will be styled with Bootstrap’s btn btn-primary classes.
This is just the tip of the iceberg: now imagine you want to add an explanation for what notes are, you can use HTML layout object:
Layout(
    Fieldset(
        'Tell us your favorite stuff {{ username }}',
        'like_website',
        'favorite_number',
        'favorite_color',
        'favorite_food',
        HTML("""
            <p>We use notes to get better, <strong>please help us {{ username }}</strong></p>
        """),
        'notes'
    )
)
As you’ll notice the fieldset legend is context aware and you can write it as if it were a chunk of a template where the form will be rendered. The HTML object will add a message before the notes input and it’s also context aware. Note how you can wrap layout objects into other layout objects. Layout objects Fieldset, Div, MultiField and ButtonHolder can hold other Layout objects within. Let’s do an alternative layout for the same form:
Layout(
    MultiField(
        'Tell us your favorite stuff {{ username }}',
        Div(
            'like_website',
            'favorite_number',
            css_id = 'special-fields'
        ),
        'favorite_color',
        'favorite_food',
        'notes'
    )
)
This time we are using a MultiField, which is a layout object that as a general rule can be used in the same places as Fieldset. The main difference is that this renders all the fields wrapped in a div and when there are errors in the form submission, they are shown in a list instead of each one surrounding the field. Sometimes the best way to see what layout objects do, is just try them and play with them a little bit.
Layout objects attributes
All layout objects you can set kwargs that will be used as HTML attributes. For example if you want to turn autocomplete off for a field you can do:
Field('field_name', autocomplete='off')
If you want to set html attributes, with words separated by hyphens like data-name, as Python doesn’t support hyphens in keyword arguments and hyphens are the usual notation in HTML, underscores will be translated into hyphens, so you would do:
Field('field_name', data_name="whatever")
As class is a reserved keyword in Python, for it you will have to use css_class. For example:
Field('field_name', css_class="black-fields")
And id attribute is set using css_id:
Field('field_name', css_id="custom_field_id")
Universal layout objects
These ones live in module crispy_forms.layout. These are layout objects that are not specific to a template pack. We’ll go one by one, showing usage examples:
Div: It wraps fields in a
<div>:Div('form_field_1', 'form_field_2', 'form_field_3', ...)
NOTE Mainly in all layout objects you can set kwargs that will be used as HTML attributes. As class is a reserved keyword in Python, for it you will have to use css_class. For example:
Div('form_field_1', style="background: white;", title="Explication title", css_class="bigdivs")
HTML: A very powerful layout object. Use it to render pure html code. In fact it behaves as a Django template and it has access to the whole context of the page where the form is being rendered. This layout object doesn’t accept any extra parameters than the html to render, you cannot set html attributes like in
Div:HTML("{% if success %} <p>Operation was successful</p> {% endif %}")
Warning
Beware that this is rendered in a standalone template, so if you are using custom templatetags or filters, don’t forget to add your
{% load custom_tags %}
Field: Extremely useful layout object. You can use it to set attributes in a field or render a specific field with a custom template. This way you avoid having to explicitly override the field’s widget and pass an ugly
attrsdictionary:Field('password', id="password-field", css_class="passwordfields", title="Explanation") Field('slider', template="custom-slider.html")
This layout object can be used to easily extend Django’s widgets. If you want to render a Django form field as hidden you can simply do:
Field('field_name', type="hidden")
If you need HTML5 attributes, you can easily do those using underscores data_name kwarg here will become into data-name in your generated html:
Field('field_name', data_name="special")
Fields in bootstrap are wrapped in a <div class="control-group">. You may want to set extra classes in this div, for that do:
Field('field_name', wrapper_class="extra-class")
Submit: Used to create a submit button. First parameter is the
nameattribute of the button, second parameter is thevalueattribute:Submit('search', 'SEARCH')
Renders to:
<input type="submit" name="search" value="SEARCH" class="submit submitButton" id="submit-id-search" />
Hidden: Used to create a hidden input:
Hidden('name', 'value')
Button: Creates a button:
Button('name', 'value')
Reset: Used to create a reset input:
reset = Reset('name', 'value')
Fieldset: It wraps fields in a
<fieldset>. The first parameter is the text for the fieldset legend, as we’ve said it behaves like a Django template:Fieldset("Text for the legend {{ username }}", 'form_field_1', 'form_field_2' )
ButtonHolder: It wraps fields in a
<div class=”buttonHolder”>, this is a legacy layout object from theuni-formtemplate pack:ButtonHolder( HTML('<span class="hidden">✓ Saved data</span>'), Submit('save', 'Save') )
MultiField: It wraps fields in a
<div>with a label on top. When there are errors in the form submission it renders them in a list instead of each one surrounding the field:MultiField("Text for the label {{ username }}", 'form_field_1', 'form_field_2' )
Bootstrap Layout objects
These ones live under module crispy_forms.bootstrap.
FormActions: It wraps fields in a
<div class="form-actions">. It is usually used to wrap form’s buttons:FormActions( Submit('save', 'Save changes'), Button('cancel', 'Cancel') )

AppendedText: It renders a bootstrap appended text input. The first parameter is the name of the field to add appended text to. The second is the appended text which can be wrapped in Django’s mark_safe to allow it to be HTML like. There is an optional parameter
active, by default set toFalse, that you can set to a boolean to render appended text active. See input_size to change the size of this input:AppendedText('field_name', 'appended text to show') AppendedText('field_name', '$', active=True)

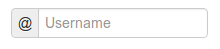
PrependedText: It renders a bootstrap prepended text input. The first parameter is the name of the field to add prepended text to. The second is the prepended text which can be wrapped in Django’s mark_safe to allow it to be HTML like. There is an optional parameter
active, by default set toFalse, that you can set to a boolean to render prepended text active. See input_size to change the size of this input:PrependedText('field_name', mark_safe('<b>Prepended text</b> to show')) PrependedText('field_name', '@', placeholder="username")
PrependedAppendedText: It renders a combined prepended and appended text. The first parameter is the name of the field, then the prepended text and finally the appended text. The text can be wrapped in Django’s mark_safe to allow it to be HTML like. See input_size to change the size of this input:
PrependedAppendedText('field_name', '$', '.00'),

InlineCheckboxes: It renders a Django
forms.MultipleChoiceFieldfield using inline checkboxes:InlineCheckboxes('field_name')

InlineRadios: It renders a Django
forms.ChoiceFieldfield with its widget set toforms.RadioSelectusing inline radio buttons:InlineRadios('field_name')

StrictButton: It renders a button using
<button>html, notinput. By defaulttypeis set tobuttonandclassis set tobtn:StrictButton("Button's content", name="go", value="go", css_class="extra") StrictButton('Success', css_class="btn-success")

FieldWithButtons: You can create an input connected with buttons:
The size of the field can be customised in the Bootstrap4 template pack by passing in the size modifier class to `input_size`.

FieldWithButtons('field_name', StrictButton("Go!"), input_size="input-group-sm")

Tab & TabHolder:
Tabrenders a tab, different tabs need to be wrapped in aTabHolderfor automatic JavaScript functioning, also you will needbootstrap-tab.jsincluded in your static files:TabHolder( Tab('First Tab', 'field_name_1', Div('field_name_2') ), Tab('Second Tab', Field('field_name_3', css_class="extra") ) )

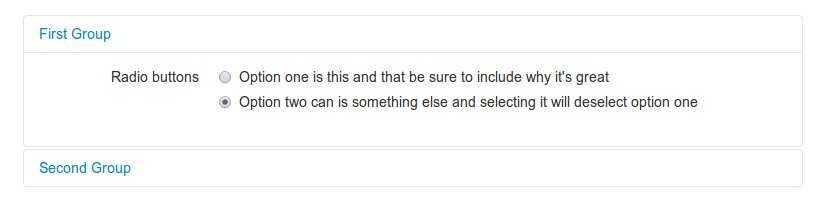
Accordion & AccordionGroup:
AccordionGrouprenders an accordion pane, different groups need to be wrapped in anAccordionfor automatic JavaScript functioning, also you will needbootstrap-tab.jsincluded in your static files:Accordion( AccordionGroup('First Group', 'radio_buttons' ), AccordionGroup('Second Group', Field('field_name_3', css_class="extra") ) )
Alert:
Alertgenerates markup in the form of an alert dialog:Alert(content="<strong>Warning!</strong> Best check yo self, you're not looking too good.")

UneditableField:
UneditableFieldrenders a disabled field using the bootstrapuneditable-inputclass:UneditableField('text_input', css_class='form-control-lg')

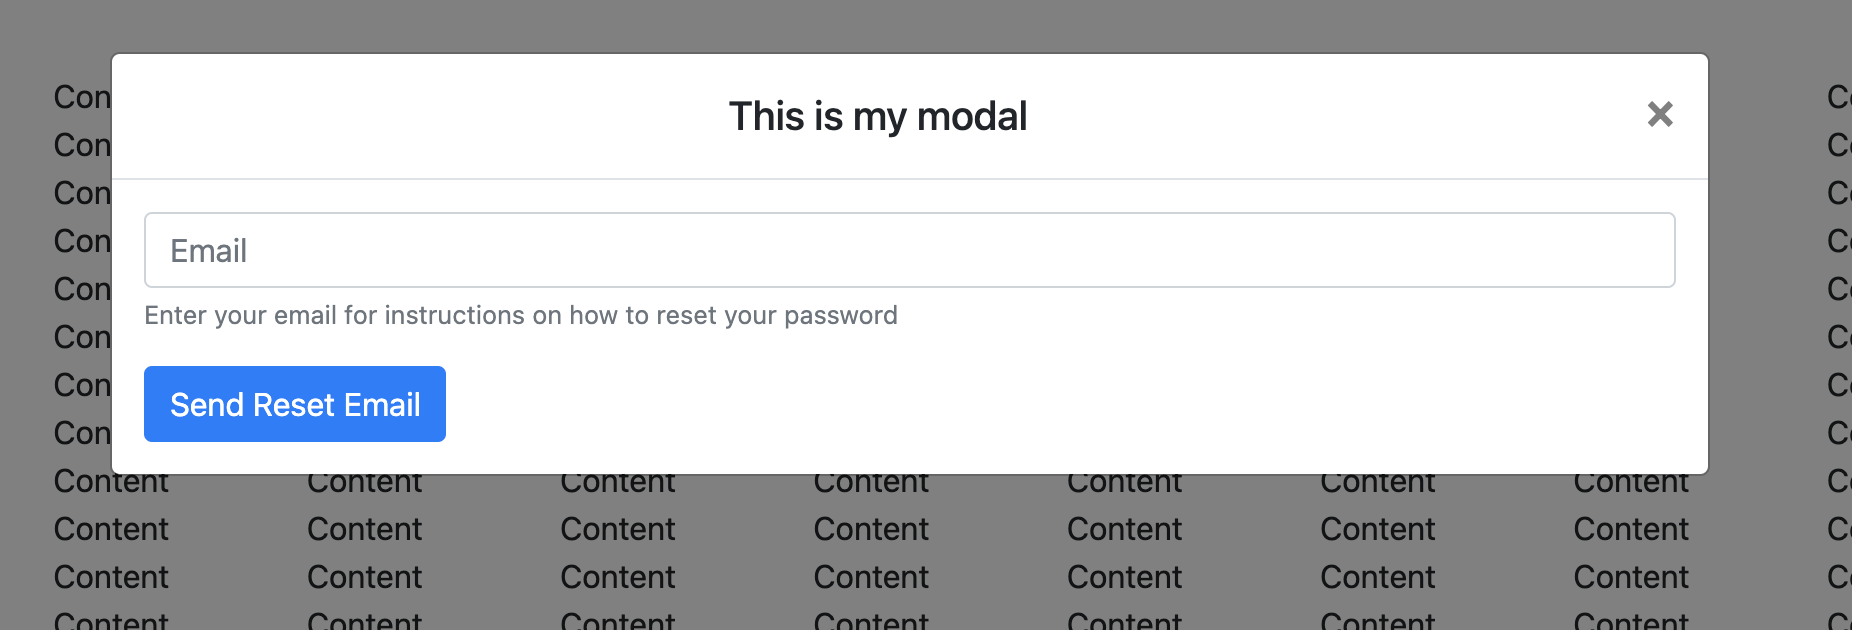
Modal:
Modaldisplays it’s fields inside a bootstrap modal that can be customized using kwargs upon initialization. See the bootstrap docs for more examples of modals and how to control your modal via attributes or via javascript. Only supports Bootstrap v3 or higher:Layout( Modal( # email.help_text was set during the initialization of the django form field Field('email', placeholder="Email", wrapper_class="mb-0"), Button( "submit", "Send Reset Email", id="email_reset", css_class="btn-primary mt-3", onClick="someJavasciptFunction()", # used to submit the form ), css_id="my_modal_id", title="This is my modal", title_class="w-100 text-center", ) )
Input group size
Input group size: By default the standard Bootstrap input sizes are used. To adjust the size of an input group (AppendedText, PrependedText, PrependedAppendedText) add the appropriate CSS class:
# Bootstrap 3 - Inputs and spans need size class. Use `css_class`.
PrependedText('field_name', StrictButton("Go!"), css_class="input-sm")
PrependedText('field_name', StrictButton("Go!"), css_class="input-lg")

# Bootstrap 4 - Wrapping div needs size class. Use `input_size`.
PrependedText('field_name', StrictButton("Go!"), input_size="input-group-sm")
PrependedText('field_name', StrictButton("Go!"), input_size="input-group-lg")
Overriding layout objects templates
The mentioned set of Universal layout objects has been thoroughly designed to be flexible, standard compatible and support Django form features. Every Layout object is associated to a different template that lives in templates/{{ TEMPLATE_PACK_NAME }}/layout/ directory.
Some advanced users may want to use their own templates, to adapt the layout objects to their use or necessities. There are three ways to override the template that a layout object uses.
Globally: You override the template of the layout object, for all instances of that layout object you use:
from crispy_forms.layout import Div
Div.template = 'my_div_template.html'
Individually: You can override the template for a specific layout object in a layout:
Layout(
    Div(
        'field1',
        'field2',
        template='my_div_template.html'
    )
)
Overriding templates directory: This means mimicking crispy-forms directory structure into your project and then copying the templates that you want to override there, finally editing those copies. If you are using this approach it’s better to just copy and edit templates you will customize instead of all.
Overriding project templates
You need to differentiate between layout objects’ templates and django-crispy-forms templates. There are some templates that live in templates/{{ TEMPLATE_PACK_NAME }} that define the form/formset structure, how a field or errors are rendered, etc. They add very little logic and are pretty much basic wrappers for the rest of django-crispy-forms power. To override these ones you have two options:
template and field_template attributes in
FormHelper: Since version 1.3.0 you can override the form/formset template and the field template using helper attributes, see section Helper attributes you can set. With this you can change one specific form or all your project forms (creating a custom FormHelper base class for example).Overriding templates directory: This works the same as explained in section Overriding layout objects templates. If you are adapting crispy-forms templates to a popular open source template pack you use, submit it so more people can benefit from it.
Creating a TEMPLATE PACK: You maybe want to use crispy-forms with you favorite CSS framework or your Company’s CSS. For doing so, you will need to be quite familiar with crispy-forms, layout objects and their templates. You will probably want to start off with one of the existing template packs, probably
bootstrap. Imagine your template pack is namedchocolate, that means you probably want your root directory named the same way. For using your template pack, you will have to setCRISPY_TEMPLATE_PACK = 'chocolate'variable in your settings file and also setCRISPY_ALLOWED_TEMPLATE_PACKS = ('bootstrap', 'chocolate'). This way crispy-forms will know you want to use your own template pack, which is an allowed one and where to look for it.
Creating your own layout objects
The Universal layout objects bundled with django-crispy-forms are a set of the most seen components that build a form. You will probably be able to do anything you need combining them. Anyway, you may want to create your own components, for doing that, you will need a good grasp of django-crispy-forms. Every layout object must have a method called render. Its prototype should be:
def render(self, form, context):
The official layout objects live in layout.py and bootstrap.py, you may want to have a look at them to fully understand how to proceed. But in general terms, a layout object is a template rendered with some parameters passed.
If you come up with a good idea and design a layout object you think others could benefit from, please open an issue or send a pull request, so django-crispy-forms gets better.
Composing layouts
Imagine you have several forms that share a big chunk of the same layout. There is a easy way you can create a Layout, reuse and extend it. You can have a Layout as a component of another Layout. You can build that common chunk, different ways. As a separate class:
class CommonLayout(Layout):
    def __init__(self, *args, **kwargs):
        super().__init__(
            MultiField("User data",
                'username',
                'lastname',
                'age'
            )
        )
Maybe an object instance is good enough:
common_layout = Layout(
    MultiField("User data",
        'username',
        'lastname',
        'age'
    )
)
Then you can do:
helper.layout = Layout(
    CommonLayout(),
    Div(
        'favorite_food',
        'favorite_bread',
        css_id = 'favorite-stuff'
    )
)
Or:
helper.layout = Layout(
    common_layout,
    Div(
        'professional_interests',
        'job_description',
    )
)
We have defined a layout and used it as a chunk of another layout, which means that those two layouts will start the same way and then extend the layout in different ways.